
Have you ever bitten into a brisket so juicy and flavorful that it felt like a revelation? For many of us, achieving that perfect balance of tenderness and taste can be a challenge. But what if I told you there’s a simple, tried-and-true method to elevate your brisket game? Enter dry brining, a technique that’s gaining popularity among home cooks and professional chefs alike.
Dry brining, as the name suggests, skips the messy brine solutions and instead relies on the meat’s natural juices. By sprinkling a careful amount of kosher salt over the brisket and letting it rest, you’re essentially creating a concentrated seasoning that enhances the meat’s natural flavor. This method isn’t just limited to brisket; it works wonders on poultry, pork, and even steak.
One of the biggest benefits of dry brining is how it prepares the meat for cooking. By allowing the brisket to air-dry in the fridge, you’re enhancing the surface texture, which leads to a crisper, more caramelized crust when you cook it. Plus, because the meat isn’t sitting in liquid, it’s easier to achieve that perfect Maillard reaction—those delicious browned flavors we all love.
Now, I know what you’re thinking: “How much salt is the right amount?” A good rule of thumb is about 1 teaspoon of kosher salt per pound of meat. This ensures you’re seasoning deeply without overpowering the natural flavor of the brisket. And don’t worry if you see the meat drawing out moisture; that’s just part of the process, and it’s what makes the final result so juicy and flavorful.
In the following sections, we’ll dive deeper into the timing, some common mistakes to avoid, and even share a few tips for taking your brisket to the next level. Whether you’re a seasoned pro or a kitchen newbie, this guide will walk you through everything you need to know to create a brisket that’s nothing short of amazing.
Understanding Dry Brining and Seasoning
When it comes to enhancing the flavor of your brisket, dry brining stands out as a superior method compared to traditional wet brining. This technique involves sprinkling kosher salt over the meat and allowing it to rest, which naturally enhances the flavor without the mess of liquid brine.
The process relies on osmosis, where the salt draws out moisture from the meat. As the meat sits, it reabsorbs this moisture, which is now rich with the flavor of the salt. This not only seasons the meat deeply but also improves its texture, making it more tender and juicy.
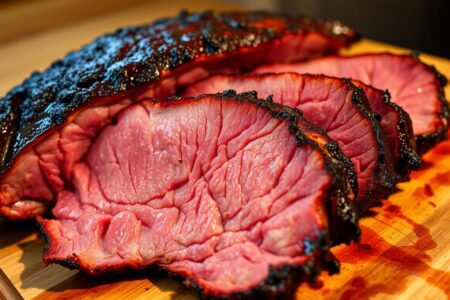
One of the key benefits of dry brining is its ability to create a crispy crust on the surface of the brisket. This is due to the enhanced evaporation of moisture, which allows for a better Maillard reaction during cooking, resulting in a flavorful, caramelized crust.
Using kosher salt is essential for this method because of its coarse texture, which distributes evenly and adheres well to the meat. Proper distribution ensures that the seasoning is consistent throughout the brisket.
Dry brining is not just limited to brisket; it works wonderfully on poultry like turkey and chicken, as well as other meats. The method is versatile and can be adapted to various recipes, making it a valuable technique for any home cook or professional chef.
By understanding the science behind dry brining, you can achieve a well-seasoned brisket with a crispy skin and deep flavor penetration. This method is a simple yet effective way to elevate your cooking and ensure your dishes are always flavorful and memorable.
Preparing Your Brisket: Essential Steps
Getting your brisket ready for dry brining is straightforward but requires attention to detail. Start by placing the brisket on a wire rack set over a rimmed baking sheet. This setup allows air to circulate evenly around the meat, which is crucial for proper drying.
Next, generously sprinkle kosher salt over all surfaces of the brisket. Use about 1 teaspoon of salt per pound of meat. Make sure to coat the meat evenly, but don’t worry if it looks too salty—it will mellow out during the resting process.
Place the brisket, uncovered, in the fridge. Smaller cuts like steak can rest for at least 45 minutes, while larger cuts benefit from overnight brining. This time allows the salt to draw out moisture, which then gets reabsorbed, seasoning the meat deeply.
After brining, avoid rinsing the salt off. Pat the brisket dry with paper towels to remove excess moisture, ensuring a dry surface for optimal browning during cooking. This step is key for achieving that crispy crust everyone loves.
Remember, the goal is to let the brisket sit undisturbed in the fridge. This ensures even salt distribution and enhances the texture. Whether you’re cooking for a special occasion or a casual meal, these steps will help you achieve a juicy, flavorful brisket every time.
Maximizing Flavor with Dry Brine Techniques
Ever wondered how to take your brisket from good to gourmet? The secret lies in refining your dry brine technique. By incorporating a few advanced methods, you can elevate the flavor and texture of your meat effortlessly.
One innovative approach is mixing a pinch of baking powder with kosher salt. This simple addition promotes even browning and results in an extra-crispy skin, as suggested by experts like Kenji López-Alt. The baking powder helps create a golden-brown crust that enhances the overall appeal of your dish.
After the initial salt application, you can further customize the flavor by adding your preferred spices. For instance, a blend of garlic powder and black pepper complements the natural taste of the meat without overpowering it. This step allows you to tailor the seasoning to your liking while maintaining the dry brine’s primary benefits.

It’s important to avoid over-salting when using spice blends. Let the salt from the dry brine take center stage, ensuring a balanced flavor. This method works wonders not just for brisket but also for poultry like chicken and other meats like steak, proving its versatility.
By implementing these techniques, you can achieve a juicy, flavorful brisket with a perfectly crisped exterior. Whether you’re cooking for a special occasion or a casual meal, these tips will help you deliver a dish that’s nothing short of exceptional.
Timing and Resting: Perfecting the Brine Process
When it comes to achieving the perfect dry-brined brisket, timing is everything. Proper resting allows the meat to absorb flavors and textures that make all the difference. The key is letting the brisket sit in the fridge on a wire rack, which promotes air circulation and helps the surface dry out for better browning.
For smaller cuts like steak, a resting time of about 45 minutes is sufficient. However, larger cuts benefit from a longer rest—up to 72 hours. This extended time ensures deep flavor penetration and a tender texture. I’ve found that giving the brisket a full day or two in the fridge really enhances the final result.
It’s important not to overdo it. Exceeding 72 hours can dry out the meat, so planning ahead is crucial. Whether you’re preparing a whole turkey or a brisket, make sure you have enough fridge space and time allocated for the process. This ensures everything turns out juicy and full of flavor.
Troubleshooting Common Dry Brine Challenges
Even with the best techniques, dry brining can sometimes present a few hurdles. Let’s tackle the most common issues and how to fix them.
- Over-salting: Too much salt can overpower the meat’s natural flavor. Use about 1 teaspoon of kosher salt per pound of meat for the right balance.
- Uneven drying: Ensure the brisket is on a wire rack to allow air to circulate. Rotate it halfway through the brining time for even drying.
- Residual moisture: Pat the meat dry with paper towels before cooking to remove excess moisture, ensuring a crispy crust.
- Adjusting flavor: If the seasoning is too strong or too mild, adjust by adding a light dusting of spices or a marinade before cooking.
Remember, practice makes perfect. Don’t be discouraged if it takes a few tries to get it just right. With these tips, you’ll be on your way to a perfectly dry-brined brisket every time!
Final Reflections on a Flavorful Brisket
After exploring the ins and outs of dry brining, it’s clear why this method has won over so many cooks. By using a simple blend of kosher salt and time, you can transform an ordinary brisket into something truly special. The process not only ensures a juicy, flavorful final product but also offers a level of control that’s hard to achieve with traditional brining methods.
One of the standout benefits of dry brining is how it enhances the texture of the meat. By allowing the brisket to air-dry in the fridge, you’re setting it up for a perfectly crispy crust when cooked. This, combined with the deep flavor penetration from the salt, makes for a truly unforgettable dining experience.
As you experiment with dry brining, remember that it’s not just for brisket. This technique works equally well for poultry, steak, and even pork. Whether you’re roasting a whole turkey or prepping a quick chicken dinner, dry brining can elevate your dish to new heights.
Don’t be afraid to get creative with your seasonings. While kosher salt is the star of the show, adding a pinch of your favorite spices can take your brisket to the next level. Just be mindful of your salt usage—too much can overpower the natural flavor of the meat.
In the end, the key to a perfect dry-brined brisket is patience. Give the meat the time it needs to absorb all those wonderful flavors, and you’ll be rewarded with a result that’s nothing short of amazing. So go ahead, give dry brining a try, and see why it’s become a staple in kitchens everywhere.
Now, I’d love to hear from you! Share your dry brining experiences and tips in the comments below. Let’s keep the conversation going and inspire each other to create even more delicious meals. #DryBrinePerfection #BrisketLove #HomeCooking