
There’s something magical about the aroma of smoked brisket wafting through the air. I remember my first attempt at smoking this Texas classic—it was a mix of excitement and nerves. Getting the temperature just right felt like a mystery, but once I nailed it, the results were unforgettable. Juicy, tender, and packed with flavor, it was a game-changer.
Mastering the smoking process isn’t just about patience; it’s about understanding the details. From selecting the right cut of meat to setting up your smoker, every step matters. In this guide, I’ll share my tried-and-true methods to help you achieve that perfect bark and melt-in-your-mouth texture.
Whether you’re a beginner or a seasoned pitmaster, these tips will elevate your BBQ game. Let’s dive in and make your next brisket the best one yet!
Understanding the Basics of Smoked Brisket
Mastering the art of smoked brisket starts with understanding the basics. This iconic BBQ dish is all about patience, precision, and a deep appreciation for the process. Let’s break down the core principles to help you achieve that perfect result.
First, the low-and-slow method is essential. Cooking at a steady, low temperature allows the meat to break down slowly, resulting in a tender and juicy brisket. This approach also helps develop a rich, smoky flavor that’s hard to beat.
A full packer brisket, which includes both the flat and the point, is the ideal cut for smoking. Its unique structure ensures a balance of lean and fatty meat, creating a harmonious texture. Properly managing time and temperature is crucial to unlock its full potential.
Consistent heat is key. Your smoker should maintain a steady environment to ensure even cooking. This not only helps with texture but also allows the rub and smoke to penetrate the meat evenly. Selecting the right side to expose during cooking can make a big difference in flavor distribution.
Finally, don’t underestimate the power of a good pepper rub. It enhances the natural flavors of the brisket and complements the smoky notes. With these basics in place, you’re well on your way to creating a masterpiece.
Choosing the Right Brisket for Smoking
The journey to perfect smoked brisket begins with choosing the right cut. A full packer brisket is the gold standard for BBQ enthusiasts. This cut includes both the flat and the point, offering a balance of lean and fatty meat. The marbling and fat distribution are key to achieving that juicy, flavorful result.
When selecting your brisket, look for even marbling throughout the meat. This ensures it stays moist during the long cooking process. A thick, yet properly trimmed fat cap is equally important. It locks in flavor and keeps the meat tender as it cooks.
If possible, opt for prime-grade brisket over choice. Prime cuts have more marbling, which translates to better flavor and texture. While choice can still yield great results, prime is worth the investment for that extra BBQ perfection.
Here’s a quick comparison to help you decide:
| Grade | Marbling | Flavor | Texture |
|---|---|---|---|
| Prime | High | Rich | Very Tender |
| Choice | Moderate | Good | Tender |
These choices directly influence the outcome of your smoked brisket. A well-selected cut ensures a delicious, melt-in-your-mouth experience every time. Take your time at the butcher counter—it’s the first step to BBQ greatness.
Properly Trimming Your Brisket
Trimming your brisket is a critical step in achieving BBQ perfection. It’s not just about removing excess fat; it’s about setting the stage for even cooking and a flavorful bark. Start by setting up a clean, sturdy cutting board and using a sharp knife. A dull blade can make the process frustrating and uneven.
Focus on the flat first. Trim it to an even thickness while preserving the natural shape of the meat. This ensures consistent cooking and prevents dry spots. Next, tackle the point and deckle. Remove any hard fat, but leave enough to keep the meat moist during the long cooking process.
I’ve found that an aerodynamic cut works best. Smooth out the edges to allow proper smoke circulation. This not only enhances the flavor but also helps develop that coveted bark. Trimming isn’t just a prep step—it’s a craft that directly impacts the final result.
Remember, the fat side should be trimmed to about a quarter-inch thickness. Too much fat can prevent the smoke from penetrating the meat, while too little can dry it out. Take your time and trust your instincts. A well-trimmed brisket is the foundation of a memorable BBQ experience.
Seasoning and Preparing Your Brisket
The secret to a flavorful brisket lies in the seasoning process. It’s not just about adding spices; it’s about creating a harmony of flavors that penetrate the meat. I always start with a binder like yellow mustard. It helps the rub stick evenly, ensuring every bite is packed with flavor.
Next, I mix a simple yet effective rub. My go-to blend includes kosher salt, coarse pepper, and granulated garlic. These ingredients enhance the natural taste of the beef without overpowering it. I apply the rub generously on all sides, making sure every inch is covered.
Timing is crucial. I recommend seasoning the brisket the night before cooking. This allows the flavors to penetrate deeply, resulting in a richer taste. The longer the meat sits with the rub, the more pronounced the flavor becomes.
Here’s a quick comparison of seasoning methods:
| Method | Prep Time | Flavor Intensity |
|---|---|---|
| Seasoning Night Before | 12+ hours | High |
| Seasoning Right Before | 1 hour | Moderate |
Proper seasoning directly impacts the final bark and overall taste. It’s a step that shouldn’t be rushed. Take your time, and you’ll be rewarded with a brisket that’s unforgettable.
What Temp to Smoke Brisket: Finding Your Ideal Temperature
The key to a tender, flavorful brisket lies in precise temperature control. Unlike rigid time-based rules, monitoring the internal temperature ensures the meat cooks evenly and reaches the perfect texture. This approach allows the fat to render properly, creating a juicy and tender result.
My ideal range for smoking is between 225°F and 250°F. At this heat, collagen breaks down slowly, transforming into gelatin for that melt-in-your-mouth feel. Higher temperatures can rush the process, risking a tough or dry outcome. Patience is your best ally here.
Every brisket hits a plateau, often around 160°F. This stall happens as moisture evaporates, cooling the meat. To overcome it, I adjust the heat slightly or wrap the brisket in butcher paper. This helps push through the stall without drying out the meat.
Toward the end, I increase the temperature to around 275°F. This final boost ensures the point and flat cook evenly, achieving that perfect finish. A reliable thermometer is essential for accuracy. I always probe the thickest part of the brisket to confirm it’s done.
Here’s a quick guide to internal temperatures:
- 160°F: The stall begins—adjust heat or wrap to push through.
- 195°F-203°F: Ideal range for tender, pull-apart brisket.
- Probe test: The thermometer should slide in like butter.
Mastering temperature control ensures your brisket turns out perfectly every time. It’s a skill that transforms good BBQ into greatness.
Setting Up and Using Your Smoker
Getting your smoker ready is the foundation of a great BBQ experience. It’s not just about turning it on; it’s about creating the perfect environment for your beef to absorb that rich, smoky flavor. Start by preheating your smoker to a steady 225°F. This low-and-slow approach ensures even cooking and tender results.
Controlling heat and airflow is crucial. I always check the vents and adjust them to maintain a consistent temperature. Too much airflow can spike the heat, while too little can smother the fire. It’s a balancing act that requires attention throughout the cooking time.
Choosing the right wood makes a big difference. I prefer oak for its robust flavor, but hickory and pecan are also excellent choices. Each type of wood imparts a unique taste, so experiment to find your favorite. Remember, the wood should complement the natural flavors of the beef, not overpower it.
Here are some practical tips for managing your smoker:
- Keep the lid closed as much as possible to retain heat and flavor.
- Use a water pan to maintain moisture inside the smoker.
- Rotate the beef occasionally for even exposure to the smoke.
Proper smoker setup leads to a more flavorful and evenly cooked result. It’s a skill that transforms good BBQ into greatness. Take your time, and you’ll be rewarded with a smoke brisket that’s unforgettable.
Understanding and Overcoming the Stall
Every pitmaster faces the stall—it’s a natural part of the smoking process. This plateau occurs when the internal temperature of the brisket stops rising, often around 160°F. It happens because moisture evaporates from the meat, cooling it down. While it can be frustrating, understanding this step is crucial for achieving perfect results.
Signs of the stall are easy to spot. Your thermometer will show no increase in temperature for an extended period. The meat might also feel firm to the touch. Don’t panic—this is normal. The key is to stay patient and maintain steady heat.
There are several ways to push through the stall. One effective method is wrapping the brisket in butcher paper. This traps moisture and helps the meat cook faster. Another option is adjusting the smoke source or increasing the heat slightly. Both techniques can help you overcome the plateau without drying out the meat.
Here are some tips to manage the stall:
- Use a reliable thermometer to monitor the internal temperature.
- Wrap the brisket in butcher paper or foil to retain moisture.
- Maintain steady heat to ensure even cooking.
Patience is your best ally during this process. Rushing can lead to tough or dry meat. Trust the way your rub and wood are working together to create a flavorful result. By mastering the stall, you’ll elevate your BBQ game and achieve that perfect, tender brisket every time.
Wrapping Your Brisket for Enhanced Flavor
Wrapping your brisket is a game-changer for achieving the perfect texture and flavor. Once the bark has formed, wrapping helps lock in moisture while preserving that crispy exterior. It’s a step that transforms good BBQ into greatness.
I prefer using unlined butcher paper for wrapping. It allows the brisket to breathe while keeping it moist. Foil is another option, but it can soften the bark too much. Here’s a quick comparison:
- Butcher Paper: Preserves bark, allows airflow, enhances flavor.
- Foil: Locks in moisture but can soften the bark.
Wrapping also helps push through the stall, a phase where the internal temperature plateaus. By trapping heat and moisture, it speeds up the cooking process without drying out the meat. I’ve found that wrapping at around 160°F yields the best results.
Here’s how I do it: Lay the brisket on a large sheet of butcher paper, fat side up. Fold the edges tightly to create a snug wrap. This method ensures even cooking and a tender finish.
Wrapping isn’t just a technique—it’s an art. It enhances the flavor, texture, and overall experience of your brisket. Give it a try, and you’ll notice the difference.
Monitoring Internal Temperatures with Thermometers
Monitoring the internal temperature of your brisket is a crucial step in achieving BBQ perfection. A reliable thermometer is your best tool for ensuring the meat cooks evenly and reaches the ideal tenderness. I always place probes in both the flat and the point to get accurate readings throughout the cook.
For the flat, insert the probe into the thickest part, avoiding the fat cap. This area tends to cook faster, so keeping an eye on it prevents overcooking. For the point, place the probe in the center where the fat is denser. This ensures both sections cook uniformly and reach the desired doneness at the same time.
Interpreting the readings is just as important as placement. When the internal temperature hits 160°F, it’s a sign to wrap the brisket in butcher paper. This helps push through the stall and locks in moisture. Once it reaches 195°F-203°F, the brisket is almost done. A quick probe test—where the thermometer slides in like butter—confirms it’s ready to rest.
Here are my tips for accurate measurements:
- Use a high-quality thermometer for consistent results.
- Check the probes periodically to ensure they’re secure and functioning.
- Record the readings to track the process and improve future cooks.
Proper probe placement and monitoring transform good BBQ into greatness. It’s a skill that ensures your brisket turns out perfectly every time.
The Art of Spritzing and Moisture Management
Spritzing your brisket is a simple yet effective way to keep it moist and flavorful. I’ve found that a 50/50 mixture of water and apple cider vinegar works wonders. This blend not only hydrates the meat but also enhances the flavor and helps develop a beautiful smoke ring.
Timing is crucial. I start spritzing once the rub has set and the bark begins to form. Using a clean spray bottle, I lightly mist the exposed meat every 45 minutes to an hour. This prevents drying without compromising the crisp exterior.
It’s important to focus only on the exposed areas. Avoid spritzing the fat side, as it can soften the bark. I also keep a clean towel nearby to wipe any excess moisture from the smoker lid, ensuring consistent heat.
Here’s how I manage the process:
- Spritz when the internal temperature reaches 160°F.
- Use a gentle mist to avoid over-saturating the meat.
- Maintain the balance between moisture and bark development.
Proper spritzing transforms the cook, keeping the meat juicy and flavorful. It’s a small step that makes a big difference in your BBQ results.
Resting Your Brisket for Maximum Tenderness
Resting your brisket is the final, yet most crucial step in achieving BBQ perfection. It allows the juices to redistribute and the collagen to relax, resulting in a tender and flavorful meat. Skipping this step can leave your brisket dry and tough, no matter how well it was cooked.
My preferred method involves wrapping the brisket in butcher paper and then a clean towel. This helps retain heat and moisture while the meat rests. I place it in a cooler to maintain a stable environment, ensuring the internal temperature stabilizes naturally.
Timing is key. I recommend resting for at least one hour, but up to several if possible. This gives the meat ample time to reabsorb its juices, enhancing both texture and flavor. Patience here pays off in every bite.
Here’s why resting is so important:
- It prevents juices from escaping when sliced, keeping the brisket moist.
- It allows the internal temperature to even out, ensuring consistent doneness.
- It improves the overall texture, making the meat easier to slice and serve.
By giving your brisket the time it needs to rest, you’ll elevate your BBQ game and create a dish that’s unforgettable. Trust the process—it’s worth the wait.
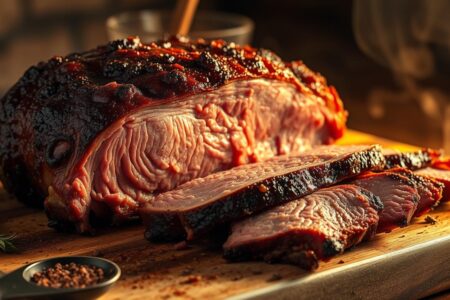
Slicing and Serving Your Perfect Brisket
Slicing and serving your brisket is the final step to BBQ greatness. The way you carve it can make or break the meal. I always start by identifying the grain—cutting against it ensures tender, juicy bites. This simple technique transforms even the toughest meat into a melt-in-your-mouth experience.

Separating the flat and the point is next. I use a sharp knife to divide them at the natural seam. For the flat, I slice at a 90-degree angle, ensuring each piece is about a quarter-inch thick. The point requires a slightly different approach—cutting it into cubes for burnt ends or thin slices for sandwiches.
Presentation is key. I arrange the slices on a platter, fat side up, to showcase the beautiful bark. Leftovers are just as versatile. Here are some of my favorite ways to serve them:
| Dish | Preparation |
|---|---|
| BBQ Plates | Serve with coleslaw and cornbread. |
| Sandwiches | Layer slices on a toasted bun with pickles. |
| Brisket Chili | Chop leftovers and simmer in a spicy tomato base. |
My go-to utensils include a sharp slicing knife and a sturdy cutting board. A butcher paper wrap keeps the brisket warm while I carve. This small tip ensures the meat stays moist and flavorful until it’s served.
With these techniques, you’ll elevate your BBQ game and impress every guest. Slicing and serving your brisket the right way is the ultimate reward for your hard work.
Brisket Smoking Tips for the Ultimate BBQ Experience
Perfecting your BBQ skills is a journey that rewards patience and precision. From selecting the right cut to mastering the internal temperature, every step matters. Here are my top tips to help you achieve that tender, flavorful result every time.
Start with a high-quality cut of meat, preferably from Texas. Trim it carefully to ensure even cooking and a beautiful bark. Season generously, and let the flavors penetrate overnight. When it’s time to cook, maintain a steady internal temperature and use butcher paper to push through the stall.
Don’t rush the process. Resting the brisket is just as important as cooking it. This allows the juices to redistribute, creating a melt-in-your-mouth texture. Experiment with different woods and rubs to find your signature flavor.
Remember, BBQ is both an art and a science. Embrace the journey, learn from each cook, and enjoy the rewards of your hard work. With these tips, you’ll elevate your BBQ game and impress every guest at the table.